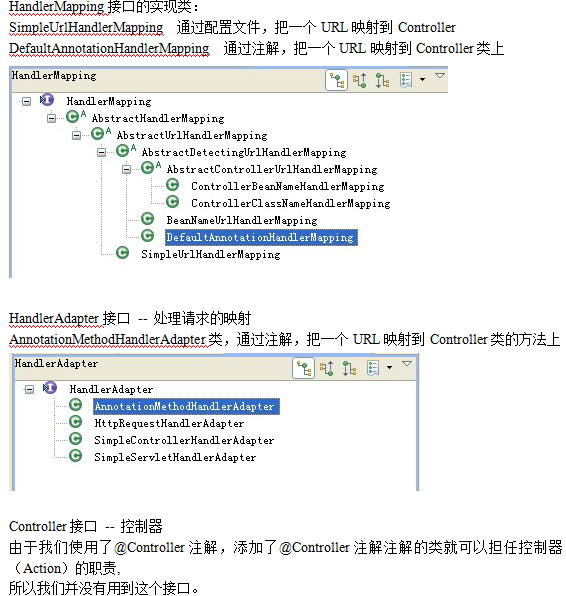


Spring集成测试数据准备策略:从手动插入到事务回滚的实战总结
大家好,我是33blog的技术博主。在多年的Spring项目开发中,我深刻体会到集成测试数据准备的重要性——它直接影响测试的稳定性、可维护性和执行效率。今天就来分享几种我在实战中总结的数据准备策略,包含具体操作步骤、代码示例,以及一些容易踩的坑。
1. 手动插入测试数据
这是最直接的方式,适用于简单的测试场景。我通常在@BeforeEach方法中手动插入需要的数据。
@SpringBootTest
@TestInstance(TestInstance.Lifecycle.PER_CLASS)
class UserServiceIntegrationTest {

    @Autowired
    private UserRepository userRepository;

    @BeforeEach
    void setUp() {
        // 准备测试用户
        User testUser = new User();
        testUser.setUsername("testuser");
        testUser.setEmail("test@example.com");
        userRepository.save(testUser);
    }

    @Test
    void shouldFindUserByUsername() {
        Optional user = userRepository.findByUsername("testuser");
        assertTrue(user.isPresent());
    }
} 踩坑提示:这种方式容易造成测试数据残留,影响后续测试。我建议在每个测试后清理数据,或者在测试前先清理再插入。
2. 使用SQL脚本初始化数据
对于复杂的数据关系,我更喜欢使用SQL脚本。Spring提供了@Sql注解,可以很方便地执行SQL文件。
@SpringBootTest
class OrderServiceIntegrationTest {

    @Test
    @Sql("/scripts/init-test-data.sql")
    @Sql(scripts = "/scripts/cleanup-data.sql", executionPhase = Sql.ExecutionPhase.AFTER_TEST_METHOD)
    void shouldCalculateOrderTotal() {
        // 测试逻辑
        BigDecimal total = orderService.calculateOrderTotal(1L);
        assertEquals(new BigDecimal("199.99"), total);
    }
}
对应的SQL文件示例:
-- init-test-data.sql
INSERT INTO users (id, username, email) VALUES (1, 'testuser', 'test@example.com');
INSERT INTO orders (id, user_id, total_amount) VALUES (1, 1, 199.99);实战经验:我习惯将SQL文件按功能模块分类存放,比如scripts/users/、scripts/orders/,这样结构更清晰。
3. 利用事务回滚保持数据干净
这是我最推荐的方式,通过事务回滚自动清理测试数据,确保测试隔离性。
@SpringBootTest
@Transactional
class ProductServiceIntegrationTest {

    @Autowired
    private TestEntityManager testEntityManager;

    @Autowired
    private ProductRepository productRepository;

    @Test
    void shouldUpdateProductPrice() {
        // 使用TestEntityManager准备数据
        Product product = new Product("iPhone", new BigDecimal("999.99"));
        Product savedProduct = testEntityManager.persistAndFlush(product);

        // 执行测试
        productService.updatePrice(savedProduct.getId(), new BigDecimal("899.99"));

        // 验证
        Product updated = productRepository.findById(savedProduct.getId()).get();
        assertEquals(new BigDecimal("899.99"), updated.getPrice());
    }

    // 测试结束后数据自动回滚,无需手动清理
}重要提醒:使用事务回滚时,要确保测试方法中不会提交事务。我曾经遇到过因为调用了@Transactional(propagation = Propagation.REQUIRES_NEW)的方法导致数据无法回滚的情况。
4. 使用测试数据构建器模式
当实体类字段很多时,我使用构建器模式来简化测试数据的创建。
// 测试数据构建器
public class UserBuilder {
    private Long id;
    private String username = "default_user";
    private String email = "default@example.com";

    public UserBuilder withUsername(String username) {
        this.username = username;
        return this;
    }

    public UserBuilder withEmail(String email) {
        this.email = email;
        return this;
    }

    public User build() {
        User user = new User();
        user.setUsername(username);
        user.setEmail(email);
        return user;
    }

    public static UserBuilder aUser() {
        return new UserBuilder();
    }
}

// 在测试中使用
@Test
void shouldCreateUserWithBuilder() {
    User user = UserBuilder.aUser()
            .withUsername("john_doe")
            .withEmail("john@example.com")
            .build();

    User saved = userRepository.save(user);
    assertNotNull(saved.getId());
}个人体会:构建器模式让测试代码更易读,也便于维护。当实体结构变化时,只需要修改构建器即可。
5. 使用Testcontainers进行数据库测试
对于需要真实数据库环境的测试,我使用Testcontainers来启动容器化的数据库。
@SpringBootTest
@Testcontainers
class DatabaseIntegrationTest {

    @Container
    static PostgreSQLContainer postgres = new PostgreSQLContainer<>("postgres:13");

    @DynamicPropertySource
    static void configureProperties(DynamicPropertyRegistry registry) {
        registry.add("spring.datasource.url", postgres::getJdbcUrl);
        registry.add("spring.datasource.username", postgres::getUsername);
        registry.add("spring.datasource.password", postgres::getPassword);
    }

    @Test
    void shouldConnectToRealDatabase() {
        // 使用真实的PostgreSQL进行测试
        // 数据准备策略与前面相同
    }
}性能考虑:Testcontainers测试启动较慢,我通常只在需要测试数据库特定功能时使用,大部分集成测试还是使用内嵌数据库。
总结与建议
经过多个项目的实践,我形成了这样的数据准备策略选择标准:
- 简单测试:使用手动插入+清理
- 复杂数据关系:使用SQL脚本
- 大多数集成测试:事务回滚 + 测试数据构建器
- 数据库特定功能:Testcontainers + 真实数据库
关键是要保持一致性——在整个项目中采用统一的数据准备策略,这样其他开发人员接手时也能快速理解测试逻辑。希望这些经验对你有帮助!
2. 分享目的仅供大家学习和交流,您必须在下载后24小时内删除!
3. 不得使用于非法商业用途,不得违反国家法律。否则后果自负!
4. 本站提供的源码、模板、插件等等其他资源,都不包含技术服务请大家谅解!
5. 如有链接无法下载、失效或广告,请联系管理员处理!
6. 本站资源售价只是赞助,收取费用仅维持本站的日常运营所需!
源码库 » Spring集成测试数据准备策略