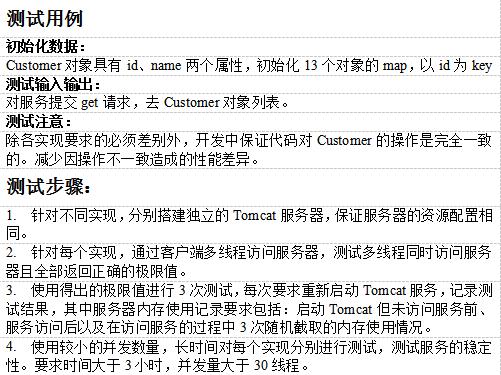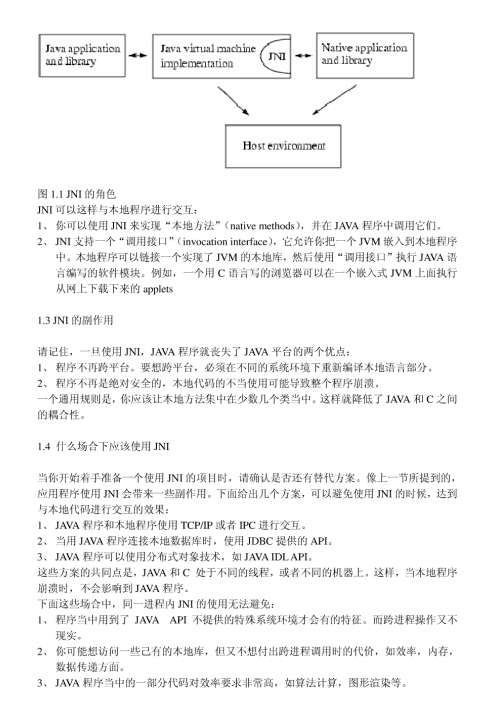


Spring Security安全框架配置与扩展完整指南:从入门到实战
作为一名在Java安全领域摸爬滚打多年的开发者,我深知Spring Security在项目中的重要性。今天,我将分享一套完整的Spring Security配置与扩展方案,包含我在实际项目中积累的宝贵经验和踩过的坑。
一、基础环境搭建与核心配置
首先,我们需要在项目中引入Spring Security依赖。以Maven项目为例:
    org.springframework.boot
    spring-boot-starter-security
完成依赖引入后,创建一个基础的安全配置类。这里有个小技巧:使用@EnableWebSecurity注解时,记得同时继承WebSecurityConfigurerAdapter:
@Configuration
@EnableWebSecurity
public class SecurityConfig extends WebSecurityConfigurerAdapter {

    @Override
    protected void configure(HttpSecurity http) throws Exception {
        http
            .authorizeRequests()
                .antMatchers("/public/**").permitAll()
                .anyRequest().authenticated()
                .and()
            .formLogin()
                .loginPage("/login")
                .permitAll()
                .and()
            .logout()
                .permitAll();
    }
}
踩坑提示:初次配置时很容易忘记.and()方法的调用,这会导致配置链断裂。记住每个配置块结束后都需要调用.and()来连接下一个配置块。
二、自定义用户认证服务
实际项目中,我们通常需要从数据库读取用户信息。这里我推荐实现UserDetailsService接口:
@Service
public class CustomUserDetailsService implements UserDetailsService {

    @Autowired
    private UserRepository userRepository;

    @Override
    public UserDetails loadUserByUsername(String username)
        throws UsernameNotFoundException {

        User user = userRepository.findByUsername(username)
            .orElseThrow(() -> new UsernameNotFoundException("用户不存在"));

        return org.springframework.security.core.userdetails.User
            .withUsername(user.getUsername())
            .password(user.getPassword())
            .authorities(user.getRoles())
            .build();
    }
}
配置密码编码器是另一个关键点。我强烈推荐使用BCryptPasswordEncoder:
@Bean
public PasswordEncoder passwordEncoder() {
    return new BCryptPasswordEncoder();
}
三、JWT令牌集成实战
在现代Web应用中,JWT已成为身份验证的主流方案。下面是我在实际项目中验证过的JWT配置方案:
@Component
public class JwtTokenProvider {

    @Value("${jwt.secret}")
    private String jwtSecret;

    @Value("${jwt.expiration}")
    private int jwtExpirationInMs;

    public String generateToken(Authentication authentication) {
        UserPrincipal userPrincipal = (UserPrincipal) authentication.getPrincipal();

        Date now = new Date();
        Date expiryDate = new Date(now.getTime() + jwtExpirationInMs);

        return Jwts.builder()
                .setSubject(Long.toString(userPrincipal.getId()))
                .setIssuedAt(new Date())
                .setExpiration(expiryDate)
                .signWith(SignatureAlgorithm.HS512, jwtSecret)
                .compact();
    }

    public Long getUserIdFromJWT(String token) {
        Claims claims = Jwts.parser()
                .setSigningKey(jwtSecret)
                .parseClaimsJws(token)
                .getBody();

        return Long.parseLong(claims.getSubject());
    }

    public boolean validateToken(String authToken) {
        try {
            Jwts.parser().setSigningKey(jwtSecret).parseClaimsJws(authToken);
            return true;
        } catch (SignatureException ex) {
            logger.error("Invalid JWT signature");
        } catch (MalformedJwtException ex) {
            logger.error("Invalid JWT token");
        } catch (ExpiredJwtException ex) {
            logger.error("Expired JWT token");
        } catch (UnsupportedJwtException ex) {
            logger.error("Unsupported JWT token");
        } catch (IllegalArgumentException ex) {
            logger.error("JWT claims string is empty.");
        }
        return false;
    }
}
四、自定义权限验证与方法级安全
对于复杂的权限需求,我们可以创建自定义的权限验证器。这是我常用的实现方式:
@Component("customPermissionEvaluator")
public class CustomPermissionEvaluator implements PermissionEvaluator {

    @Override
    public boolean hasPermission(Authentication authentication,
                               Object targetDomainObject,
                               Object permission) {
        if ((authentication == null) || (targetDomainObject == null) || !(permission instanceof String)) {
            return false;
        }

        String targetType = targetDomainObject.getClass().getSimpleName().toUpperCase();
        return hasPrivilege(authentication, targetType, permission.toString().toUpperCase());
    }

    @Override
    public boolean hasPermission(Authentication authentication,
                               Serializable targetId,
                               String targetType,
                               Object permission) {
        if ((authentication == null) || (targetType == null) || !(permission instanceof String)) {
            return false;
        }
        return hasPrivilege(authentication, targetType.toUpperCase(),
                permission.toString().toUpperCase());
    }

    private boolean hasPrivilege(Authentication auth, String targetType, String permission) {
        for (GrantedAuthority grantedAuth : auth.getAuthorities()) {
            if (grantedAuth.getAuthority().startsWith(targetType) &&
                grantedAuth.getAuthority().contains(permission)) {
                return true;
            }
        }
        return false;
    }
}
在Service层使用方法级安全控制:
@Service
public class UserService {

    @PreAuthorize("hasRole('ADMIN') or @customPermissionEvaluator.hasPermission(authentication, #userId, 'USER', 'READ')")
    public User getUserById(Long userId) {
        // 业务逻辑
    }

    @PreAuthorize("@customPermissionEvaluator.hasPermission(authentication, #user, 'WRITE')")
    public User updateUser(User user) {
        // 业务逻辑
    }
}
五、实战中的性能优化与安全加固
经过多个项目的实践,我总结出几个重要的优化点:
1. 会话管理优化:
@Override
protected void configure(HttpSecurity http) throws Exception {
    http.sessionManagement()
        .sessionCreationPolicy(SessionCreationPolicy.STATELESS) // 无状态会话
        .maximumSessions(1) // 单用户最大会话数
        .expiredUrl("/login?expired");
}
2. CSRF防护配置:对于RESTful API,通常需要禁用CSRF:
@Override
protected void configure(HttpSecurity http) throws Exception {
    http.csrf().disable(); // 仅限无状态API
}
3. 安全头信息配置:
@Override
protected void configure(HttpSecurity http) throws Exception {
    http.headers()
        .contentSecurityPolicy("script-src 'self' https://trustedscripts.example.com; object-src https://trustedplugins.example.com;")
        .and()
        .httpStrictTransportSecurity()
        .includeSubDomains(true)
        .maxAgeInSeconds(31536000);
}
六、常见问题排查与调试技巧
在调试Spring Security时,我经常遇到以下几个问题:
问题1:权限配置不生效
解决方案:检查@EnableGlobalMethodSecurity注解是否启用,并确认prePostEnabled=true
问题2:自定义过滤器顺序错误
解决方案:使用http.addFilterBefore()或addFilterAfter()明确指定过滤器顺序
问题3:密码编码器不匹配
解决方案:确保注册和登录时使用相同的PasswordEncoder实例
通过这套完整的配置方案,我在多个生产环境中成功部署了安全可靠的Spring Security系统。记住,安全配置不是一劳永逸的,需要根据业务需求持续优化和调整。希望这份指南能帮助你在Spring Security的配置道路上少走弯路!
2. 分享目的仅供大家学习和交流,您必须在下载后24小时内删除!
3. 不得使用于非法商业用途,不得违反国家法律。否则后果自负!
4. 本站提供的源码、模板、插件等等其他资源,都不包含技术服务请大家谅解!
5. 如有链接无法下载、失效或广告,请联系管理员处理!
6. 本站资源售价只是赞助,收取费用仅维持本站的日常运营所需!
源码库 » Spring Security安全框架配置与扩展完整指南